
Bivy bag or tent? Or something different? An often occurring thought for many hikers and outdoor people. However, after finally deciding to acquire a bivy bag, you will find a wide range of various alternatives, from low cost to really expensive, and in many different kinds of shapes; and despite the huge variety of different bivies, you might still not find the one that suits you best. That leaves you with one solution: DO IT YOURSELF! In this post I will elaborate how I made my own bivy bag, explain why I choose certain materials, and provide you with some patterns that I used for my own DIY bivy bag.
Why did I want to make my own bivy bag?
In the past years, during most my hiking and outdoor adventures, I was often thinking about the “proper” way of housing and what gear to use. “Bivy bag or tent” – a thought that often reoccurred, but I mostly decided to go with a tent. While I don’t want to further elaborate the advantages and disadvantages of bivies and tents, I made the decision to additionally get myself a bivy bag.
As it turned out, it was not easy at all to choose a bivy from the huge amount of different alternatives: If you start looking for a bivy bag to buy, you will quickly find bivies ranging between approximately 20 € and 400 €, and most of them have a good right to exist for their various purposes, from single use to frequent usage. Taking a closer look one will recognize that the price often correlates with used the materials, whereas breathability is a particularly important characteristic. Basically, one should decide whether to use a bivy bag for emergency situations (single use; low prices), or for planned and regular use of the bivy bag. In the latter category (also reflecting my intentions), you are obviously in the higher price segment. The materials usually offer more durability, and maybe even more important, better breathability: Since you don’t have much space in your bivy bag, the water you perspire (and the humidity inside) need to go somewhere. If it stays inside, you might not only feel less comfortable, but especially when it is cold, your humid gear will loose its ability to insulate properly and thus won’t be able to keep you warm. That’s one of the worst thing that can happen to you when sleeping outdoors in winter time! As said above, well breathable and vapor transporting materials are, little surprisingly, more expensive: if you want to get a good bivy bag (let’s say, made from eVENT® or Gore-Tex®), the costs will easily exceed 300 € – unless you make it yourself. But also the shapes of the various bivies in that price segments vary widely. First it was difficult for me to find one in the design I imagined. Nonetheless, after getting a clearer picture of the desired design I did some research and figured that it is possible to make one myself for less than a hundred Euro, with the huge benefit, that I would be able to tailor my bivy bag. In the following I will explain which type I chose, why I preferred certain materials, and how the process of finishing my bivy bag developed.
Choosing the form of my DIY bivy bag
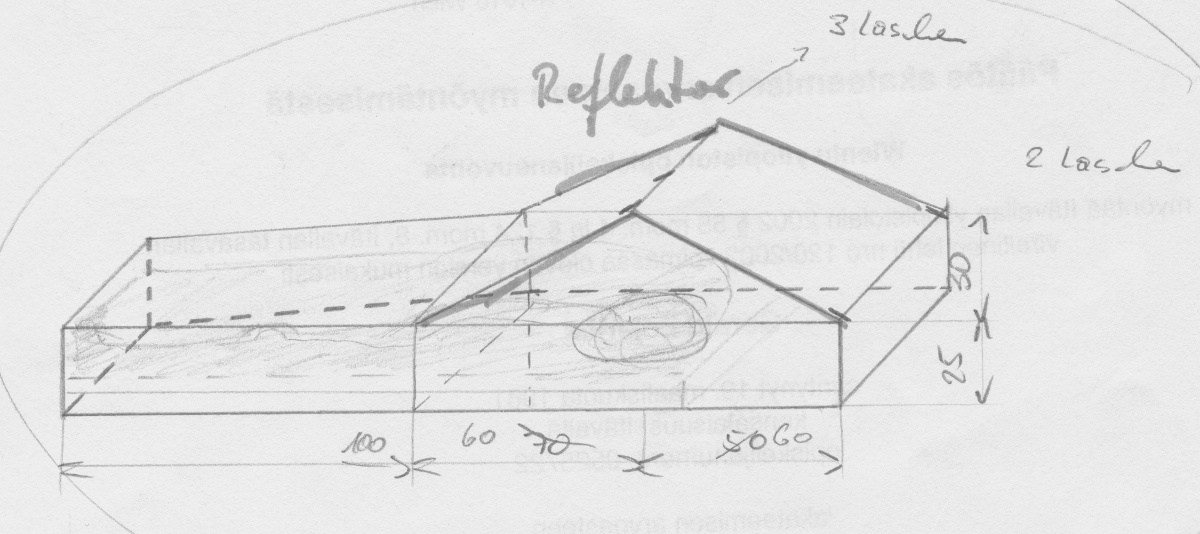
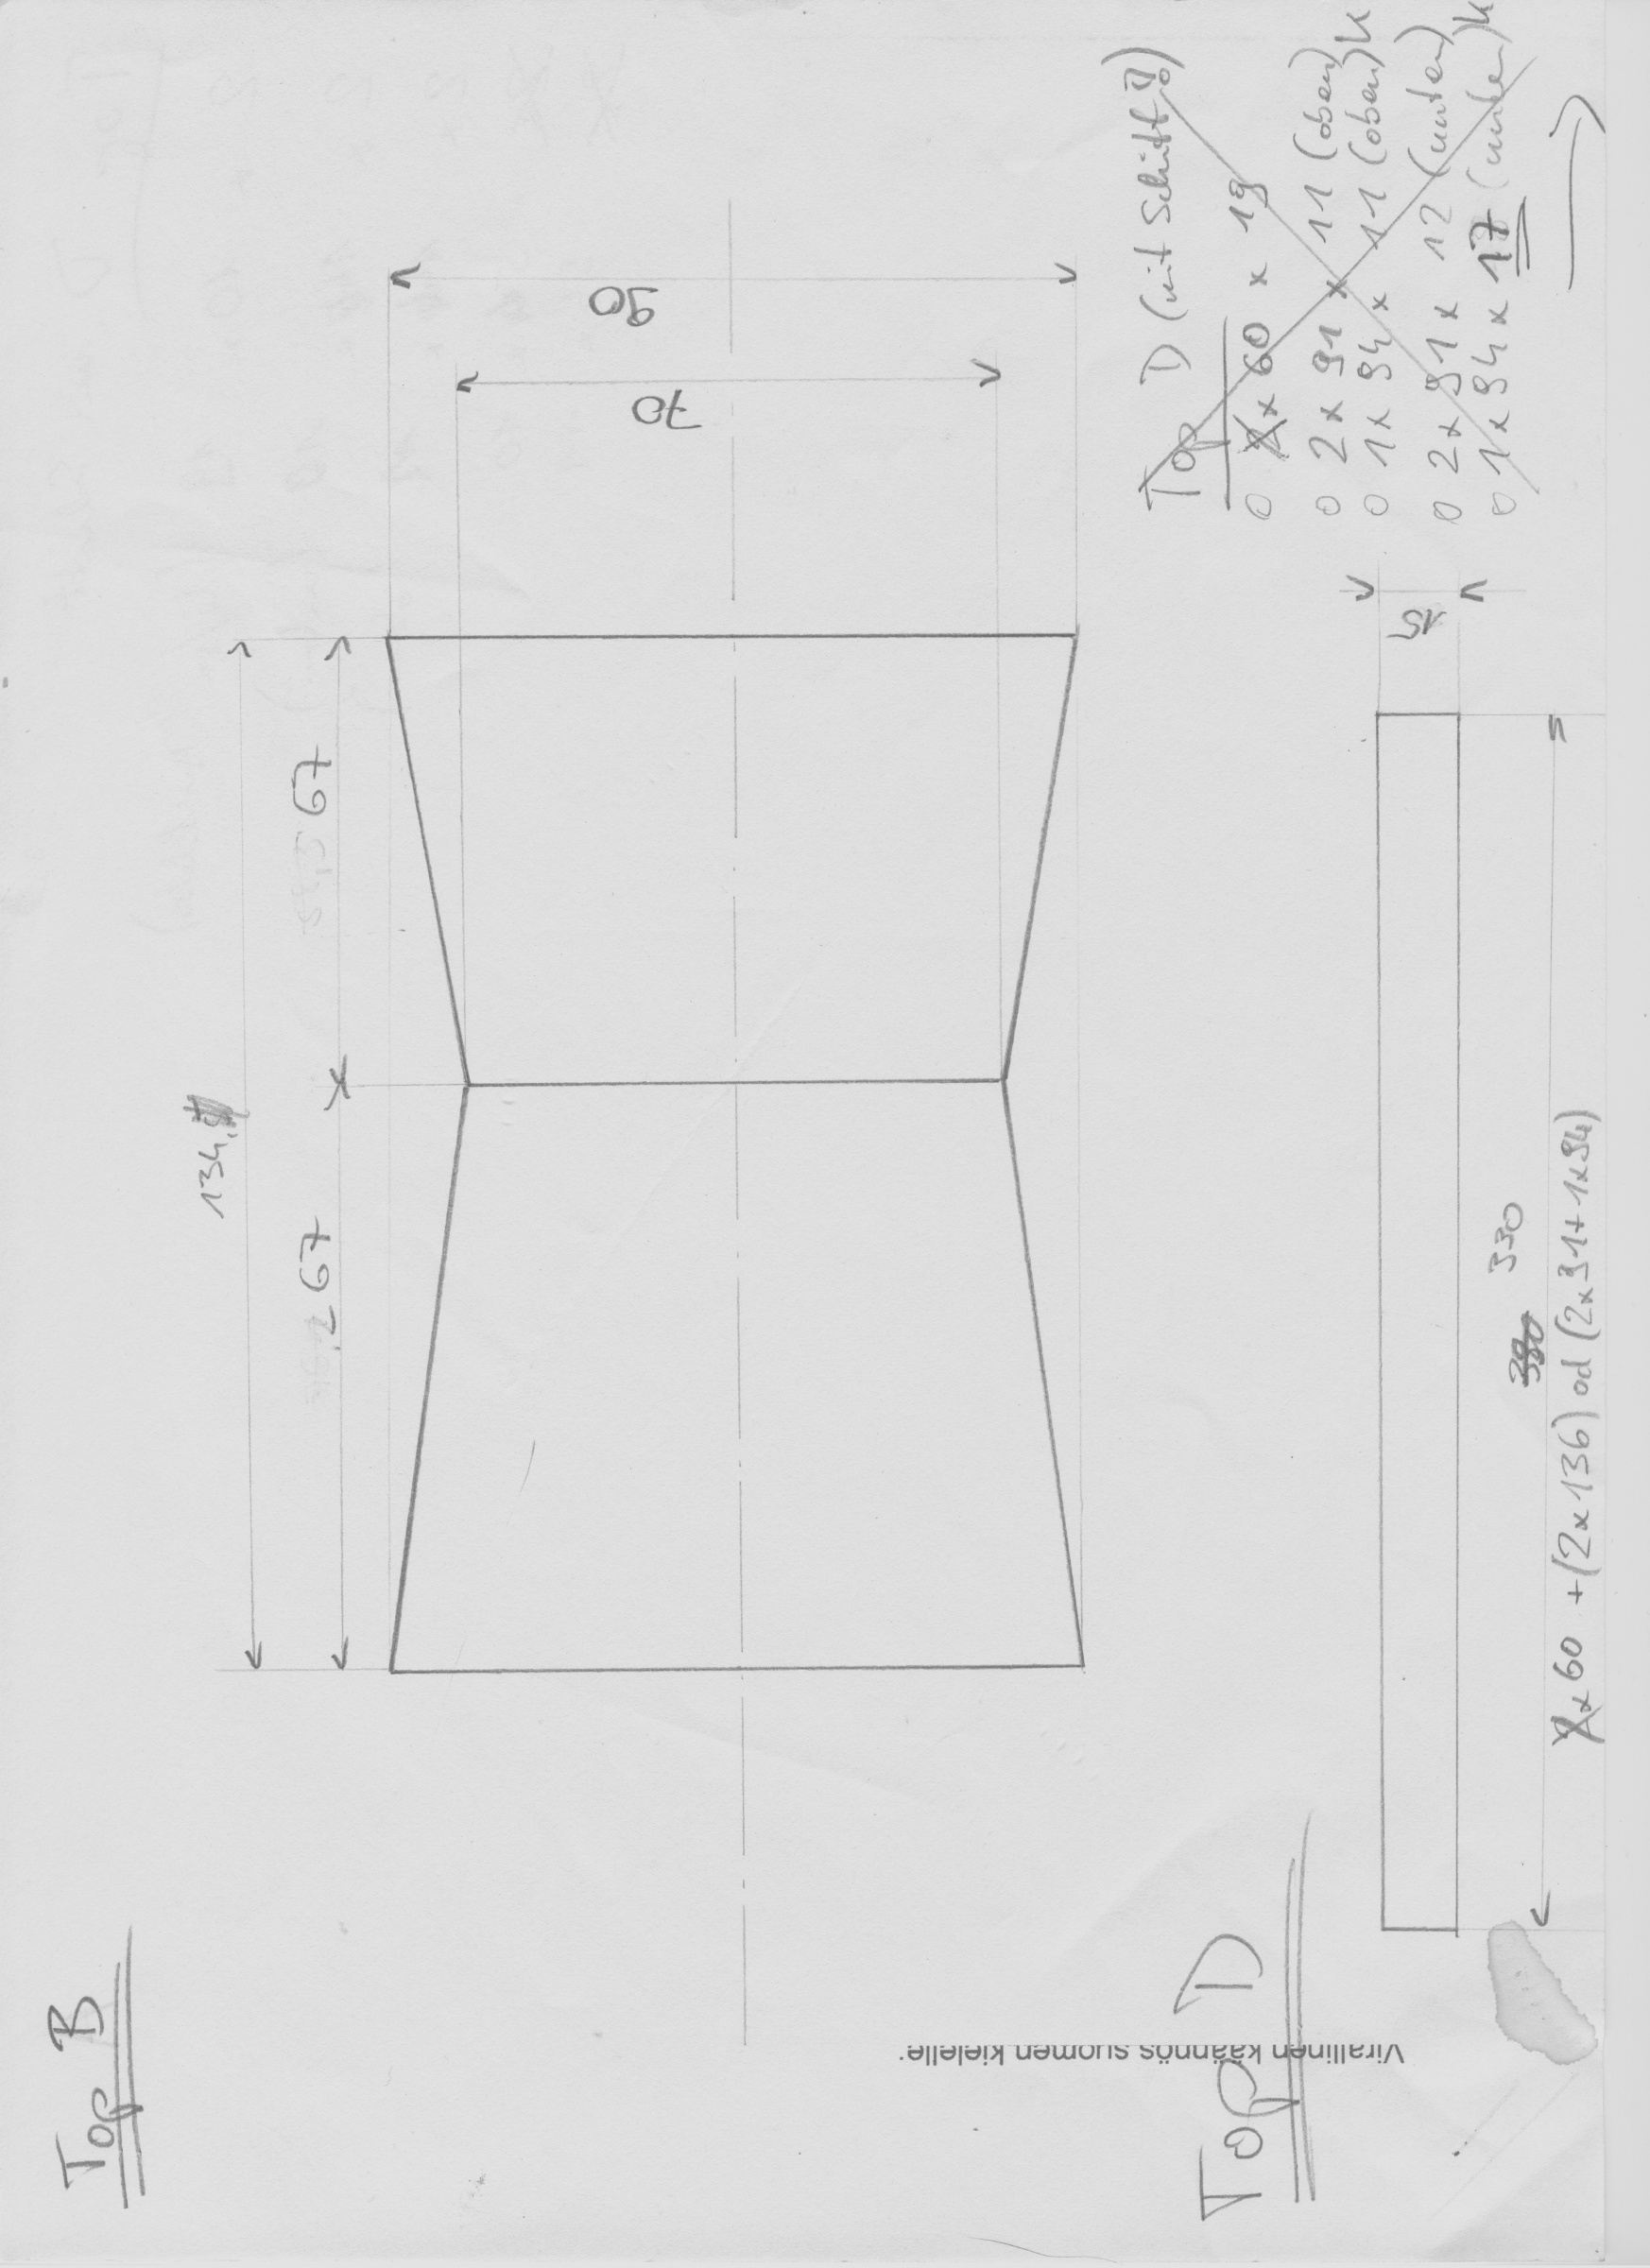
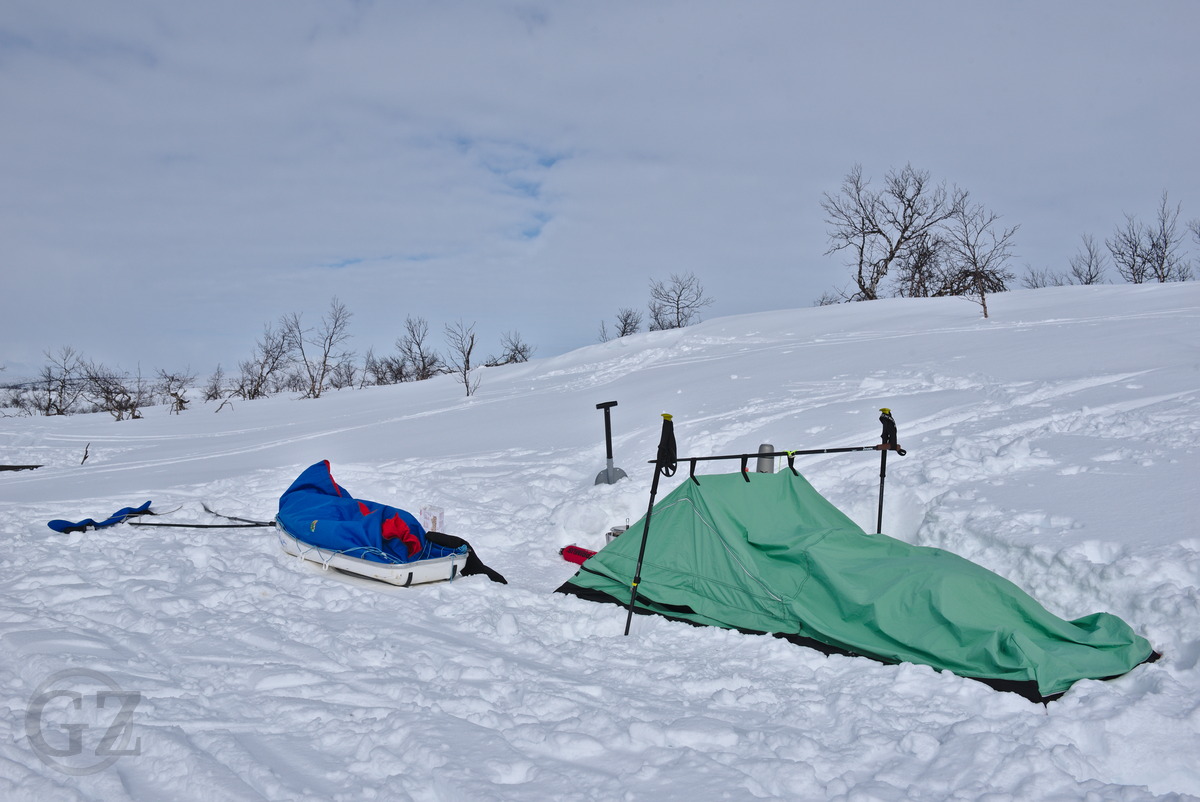
Before I decided to create my own bivy bag, I was browsing the Internet, looking for a proper one to buy. This search remained unsuccessful, since I couldn’t find an available proper combination of shape and functionality (material). On my search however, I already stumbled over some DIY biviy bags that inspired me to try it myself. What I wanted to have was a bivy bag that would not require to carry around poles, and yet spacious enough if one gets stuck inside due to bad weather: For winter and rainy weather I wanted to have a full coverage, including the head area, and it should be possible to be completely closed in – like in a tent. It also seemed to be advantageous to have a bathtub construction, avoiding seems on the bottom. To not get condensation water straight into my face, I thought it would be good to have the fabric lifted above the head, which also prevents you from feeling locked in or being stuffed into your bivy. Additionally, I wanted to have some extra space to put in some clothes or boots, and to have it spacious enough to be able to read a book inside. Eventually I thought that I wanted to get a hybrid of a one person tent and a simple bivy bag. While poles should not be necessary, I thought it might be advantageous to be able to use hiking or skiing poles for building it up if wanted. To finalize the form, I created a few smaller models, first from paper or cardboard, before making a 1:1 prototype from old bed sheets. This way I was able to get inside with my gear (mattress and sleeping bag) to get a feeling for the size and functionality, before making final changes to the design and starting to cut the expensive outdoor textiles.
Main Materials
After getting a rough idea about the shape of the bivy, I went on with searching for proper materials. While weight was not the main issue for me as it is for many ultralight backpackers, I wanted to get a compromise between durability, water- and windproofness – as well as breathability (this was a very important part of my decision-making process), but still it should be as light as possible of course.
Let’s start with the bottom: My idea was to give the bivy bag a bathtub bottom with a typical tent ground sheet material. I didn’t want to go under 4000 mm water column, since the ground here in this region often is a bit swampy or wet. Because of the thin soil layer here, you will often find small stones or rock on the floor, so the ground sheet also was supposed to be durable to a certain extent. To also consider the weight of the bivy, I finally ended up with choosing a lightweight (90g/m²), multilayered, one-side PU-coated, fluorcarbon-impregnated, high-tenacity nylon, with a water column of (min.) 5000 mm.
For the upper shell I was looking for a material that is highly breathable, water- & windproof, as the most important characteristics. Weight was not as much important, but of course came after the above mentioned criteria. This is simply because I think, that getting out the vapour of your bivy is of utmost importance especially in a cold environment, since humidity will decrease the insulating capabilities of your other gear (sleeping bag etc.). At temperatures far beyond freezing insulation becomes crucial. For a similar reason the bivy also should be windproof, to avoid windchill but also that warmer air inside would get blown away. Thinking about those features, I was looking for a waterproof garment material, since clothing necessarily need to be breathable (coated nylon materials, as used for many tents, are also water-& windproof, but not as breathable and vapor permeable). Technically a 2-layer laminate material should be sufficient, however, I wanted to have a third layer, to increase durability by protecting the second, water resistant (in my case PTFE) layer from damage (e.g. from sleeping bag zippers). The material I choose has a carbon film inside to protect the middle layer; this is very lightweight and makes it easy to fold it small. While the supplier did not specify the brand of the fabric, the material’s characteristics and looks reminded me on a Gore-Tex® Paclite® shell, which is usually used for very lightweight 3rd layer clothing, like waterproof jackets or pants.
Since I also want to use the bivy bag in summer time, I wanted to have a mosquito net included in a way that the bivy bag can also be used “open” at the head area. In the past years I have learned however, that mosquitos are not the only – and certainly not the most annoying insects in Lapland, but that also black flies and noseeums (biting midges), which both are smaller than common mosquitoes, can make your outdoor experience nasty. Thus I bought the net with the finest mesh I could find (155 mesh/cm² | 1000 mesh/inch²). With (25g/m²) it also doesn’t add much to the weight.
Accessories: Sewing, Sealing, Zippers & Visibility
For the sewing I chose a yarn which has a polyester core and a cotton coat (Corespun). The cotton is able to expand when getting wet, to keep the stitches sealed, while the polyester core improves the tear strength. Additionally I choose to glue a seam tape over the seams, to enforce the waterproofness.
It took me quite a while to decide whether to use a regular zipper or an Aquaguard® zipper. The advantage of the Aquaguard® (as the name suggests) is that it is water-repellent, which – according to manufacturers – makes a strap over the zipper unnecessary (thus reducing work and material). However, knowing water-repellent zippers from some of my clothing and my backpack, I don’t really like them and often find them hard to close or open; Particularly considering it for a bivy bag I wanted to avoid that. Moreover, I don’t entirely trust their water- and windproofness and was furthermore afraid that in winter wind could blow snow onto or into the zipper, which combined with the discharged body heat, might cause icing (However, these are just assumptions/fears that I have no proof for). So I decided that I would use a strap over them (to be fastened with a Velcro), which is why I finally decided to go for the regular (coil) zipper. Not being the main reason for this decision, but the fact that the Aquaguard® would have been four times more expensive than a regular zipper, which eventually also contributed to keep the overall price lower. That being said, I went for a regular coil zipper, since I believe that the better flexibility will make the bivy bag easier to fold and pack. For the outside, I choose a 10 mm coil zipper (probably 6mm would do it as well, but when I ordered only the 10mm was available in that length). The upper shell is supposed to be kept from falling into my face by tightening it with a tent-cord to a rock, tree, skiers, a hiking pole, crashed airplane, or whatever is around. For safety and easy finding I chose a reflecting cord with a fluorescent tent fastener in order to increase visibility. Additionally I decided to include some light reflecting materials to further increase visibility when laying on the ground, so I added some reflective piping along some of the outer seams. And finally I also needed some small webbing for attaching the tent-cord, plus to sew-in two small loops at the foot end, to hang the bivy bag for drying purposes etc. (but which could also be used to tighten the bivy bag in a stormy place, while being outside).
Supply List
To summarize, here is the list of supplies that I used to manufacture my bivy bag:
- Groundsheet: 2.3 meter of one-sided PU-coated hight-tenacity nylon, fluorcarbon-impregnated, water column: (min.) 5000 mm, lighweight (90g/m²)
- Upper shell: 3-layer laminate with a PTFE-membrane, ripstop structure, lightweight (110g/m²)
- Mosquito Net: Polyamid, 155 mesh/cm², lightweight (25g/m²)
- Yarn: Corespun (polyester thread with cotton coating)
- Seam Tape (22 mm)
- Zipper: regular coil (NOT water-repellent); outside: 10 mm (could be slimmer)
- Tent Cord: reflecting, 4 mm
- Tent Fastener: Clamcleat®, Line-Lok (fluorescent)
- Reflective Piping: 9 mm, EN471
- Webbing (10 mm)
- Velcro
Patterns (preliminary)
One of the reasons why it took me so long to put this article online (basically I wrote it about a year ago) was because I was planning to make digital copies of my sketches. Since I didn’t find the time yet, I decided to just put my horrible hand drawings online. Hopefully they are still of help or may serve as a starting point for your own design.
This was the first time I designed something made of fabric, so I am certain it would be possible to improve on it. To the drawings I generally added one cm everywhere for seam allowance. I mainly used a double felled seem.
I hope in the next weeks & months I will be able to upload more images from the details of my DIY bivy bag.


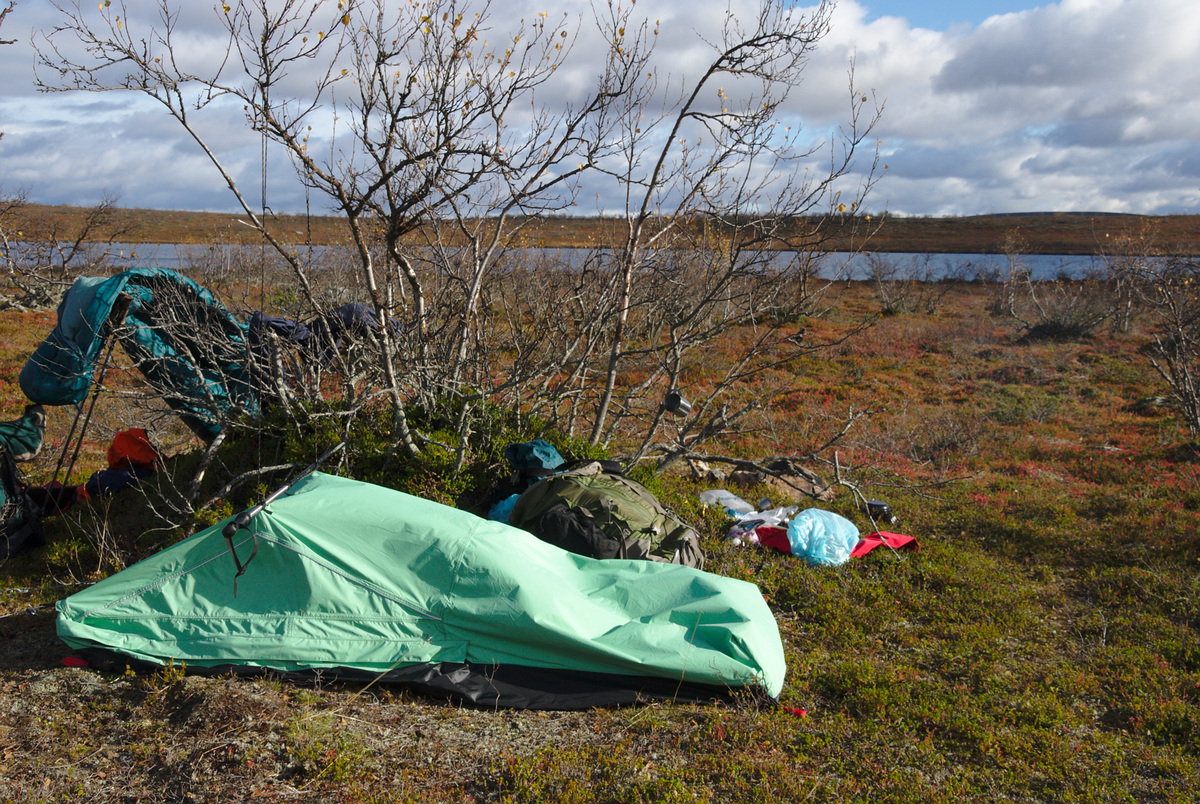
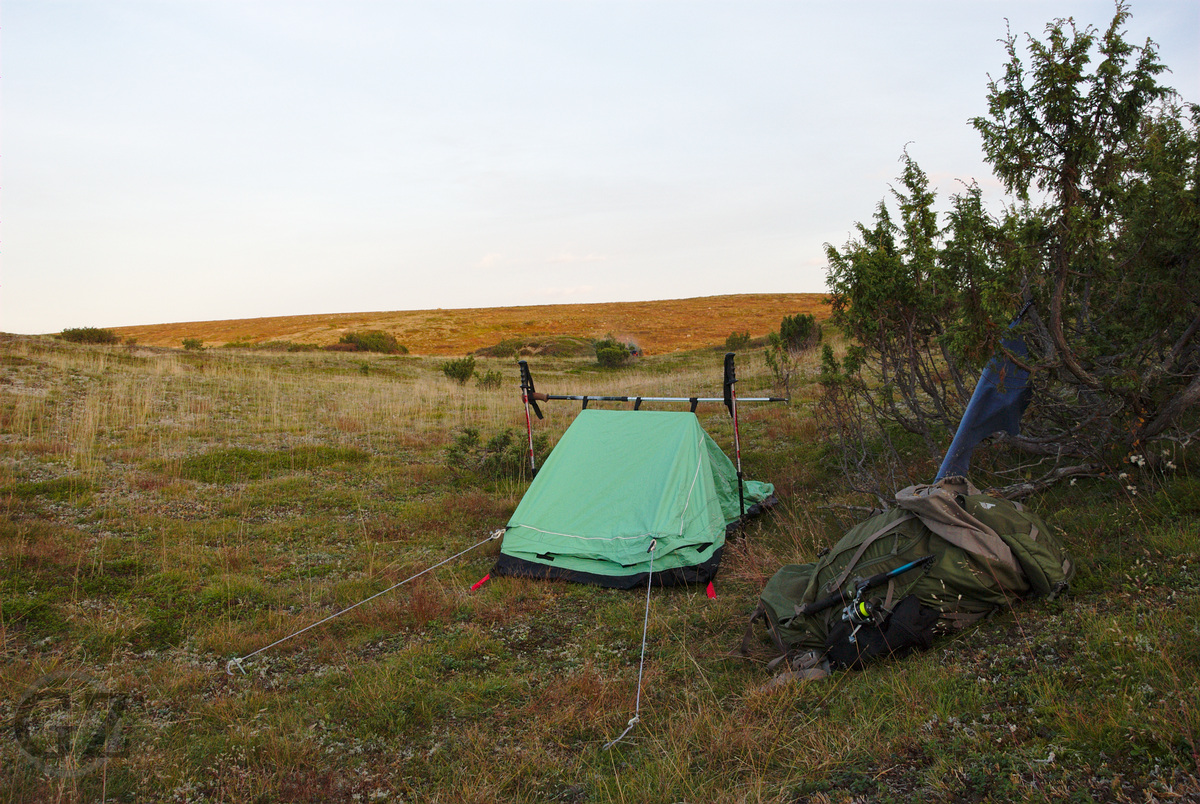
Trips from where I have images of the bivy in action
Springtime in Pöyrisjärvi Wilderness Area – Skiing Between Reindeer Herds
Late Summer and Early Winter – Hiking through the Pöyrisjärvi Wilderness Area
Taking Advantage of the Spring Sun – Skiing in Pöyrisjärvi Wilderness Area
Suppliers for outdoor fabrics
You’ll find a couple of online stores with good selection of materials and Accessories. These are the shops where I usually buy supplies for outdoor projects:
Extremttextil (based in Germany)
Shelby (based in Finland)

Thanks for this! I live in Ontario, Canada and temperatures can range from -40 to + 40 Celsius. In the early summer, the blackflies and mosquitoes will eat someone alive. In the winter, fabric flexibility and handling is a critical issue. I like your approach and am now actively looking at replicating your design. I have two questions, what would you change now, and how much top fabric did you use? I see 2.3 m for the base, but nothing specific for the top. As I’m using my phone, the plans are somewhat difficult to see, but much appreciated. Thanks
Hi Shawn!
Unfortunately I don’t remember how much material I ended up using for the top layer. Too bad that I forgot to write that down! Though, I check from my old orders and saw that I ordered 4m then.
Originally I intended to use the bivy all year around, but it turned out that I only use it in winter these days, while during the snow-less time I prefer to travel with my tarp. I had planned also to integrate a mosquito net, however, because of time constraints I ended up leaving it out. The top material is not enough breathable when it comes to actual breathing. So it is not possible to completely close the bivy and sleep, it always requires some opening of the zipper for ventilation. Overall, I am quite satisfied with the form though. So far I wouldn’t have found anything that I would change from the design. Maybe it could include some air vents, similar to those that you usually find on tents. Otherwise it suits my purpose quite well.
Hi Gerald.
I was just looking at the list of waterproof breathable materials i could choose from Extremtextil.de, and i decided to search for diy instructables for bivy bags. And then i found your blog.
There is a filter on extremtextil list of W/B materials that narrows the list to 5. If you look on the available filters you’ll find something called range of applycation, and you can choose ” bivy sack “. From these 5 only 2 are less than 100 gr/sqm and truly W/B
Sorry i can’t paste links here.
One costs 12.57 / m and looks very much like THE 37.5 XTEX carbon coated materials Crux and Lightwave are using for their single wall tents, like the Sigma 15 or the Crux Raid. Only that without the carbon coating.
The other costs 31 /m and is elastic, but looks much more packable.
Is it worth in your opinion to spend 31 euros / m, instead of the 12 of the cheaper one ?
Thanks
Oscar
Sorry for the late answer. As far as I can see, the cheaper material for 12,57 is a 2nd choice material, where waterproofness cannot be guaranteed. So I guess you take that risk of going for the cheaper material. Other than that it is hard for me to judge anything on the materials, as I did not see any samples of them.
Good luck with your project!
Hi Gerald! Would you be able to post or send me the link to the site where you ordered your top layer material from? I’m making a bivy of my own and having a very difficult time finding material that is waterproof and breathable. Like you, I am prioritizing waterproof-ness and breathability over weight for this project. Thanks!
Hi Rosie,
I got my top-layer fabric from extremtextil, which is based in Germany. I think they don’t have the same material anymore on stock, but they do have some other promising looking fabrics available: https://www.extremtextil.de/en/fabrics/breathable-and-waterproof.html
I wish you all the best for your project!
:-)
Ive made a poncho/bivi bag, which I can also use as a tent by adding a Cuben porch. Also a s/bag cover. Very interested then to read about your project, as I had many similar issues as yourself, e.g. durability vs. v. light, as I go to Norway a lot.
I used exactly the same “P***lite” as you did, from Extremtextil. Same apple green colour ! And for the bag cover used midgeproof netting, and the same 90 gm PU groundsheet material. So glad I used something robust, because of twigs, gnarled roots & stones.
Using the same pattern, I made lighter versions , using silnylon,etc,for below treeline use.
Reassuring to see someone coming to the same conclusions!
Hi Gerald:
Thank for your post of your self-made bivy-sack.
I am in the process of designing my own bivy-sack and have a couple questions.
I’m hiking the Pacific Crest Trail (PCT) starting March 1, 2018. The first 700 miles are desert, with two high altitude camps likely in snow. Last year I found I only used my 680 gram tent twice. Mostly spleeping on a TyVek ground cloth. “TyVek” is a non-woven breathable material used to wrap houses here in the states before putting the sheathing layer on our “stick-built” homes. I was impressed with my German hiking partner’s Bivy sack for it’s speed in setup & take-down.
On the PCT, backpack base-weights less than 7 kg.s is of utmost importance. “Base-weight” meaning everything but food & water. So I’m trying to make an “ultralight” bivy-sack.
My design is arched and uses 1 – 2 mm carbon fiber rods to support the structure. One at the foot, and one at the head. Like you, I intend on making a bathtub floor. For the arched top I intend to use Dyneema (also known as “Cuben fiber”. To save weight, the ground cloth I intend to use is made from Polychro or polyethylene.
Did you consider Dyneema for the top?
What would you consider the lightest waterproof material for the bathtub floor? You mentioned in your post using an ultra-fine mesh bug screen that rain will not penetrate. Does it work well?
I am still very much in the design phase, and your input would be most welcome. I am sorry, but I do not yet have drawings to share with you.
Regards,
Russ Jones (“RJ”)
cell: 458-292-8875
Tikkun_Olam1@protonmail.ch
“Tikkun Olam” (Hebrew)
= ‘Repair the World’ (Literally)
= “To behave and act constructively and beneficially.” (Defined)
Hi Russ,
thanks a lot for your questions!
When I was planning my bivy, light-weight was not the most important criterion for me. So the material choice was influenced by looking also for breathability (with the top layer) and generally for durability.
Top Layer
In particular breathability was one of my main concerns. I am using my bivy also in winter time, and here in Lapland this can mean very low temperatures (in extreme down to -45°C/-49°F). So getting out vapor or humidity is crucial, as all the water that stays in might then remain in the insulation of the sleeping bag or other gear, reducing its insulation capacities day by day. I was afraid that particularly during longer trips this could become crucial. For this reason I started my search with materials that are usually used for sports clothing, and which focus also on breathability.
Then, I also appreciate durability. This is also where I am a little critical toward the ultralight trend I sometimes see with MYOG projects. Of course I want my gear as well to be as light as possible, non doubt; but to me as important as weight is durability. Most of the materials available or used today for outdoor gear are based on plastic. Due to its significant environmental impact I am generally eager to use as little plastic as possible. For this reason I am trying to make my gear to last as long as possible, so I can avoid to bring even more plastics into circulation. For example, for the same reason I am continuously replacing old insulation layers of clothing (for which I formerly often used fleece) with wool, even though it is more heavy and takes longer to dry. On the other hand, besides being more environmentally friendly, it also doesn’t start to smell bad when you don’t get to have a shower for some time ;-) Anyhow, of course for different purposes and different regions, different materials may be more or less better suitable. We are lucky that today we have such a huge variety of for its purpose amazing materials.
So to come back to your question: I was thinking about Tyvek (I actually use it in another setup as a ground sheet) or other alternatives. From what I read, Dyneema is not performing that well in regard of breathability, and also has a reputation of being less durable than many textiles originally designed for clothing (the latter is also the case – and my experience – with Tyvek).
One more thing regarding my top-layer choice. I discovered one downside with the material choice – or design – of the bivy above: during night time I need to keep the zippers a little open somewhere, as otherwise I have the feeling to not get enough oxygen inside. So apparently my material choice does not sufficiently let in fresh air. If I would make the bivy again, I think I would consider this in the design, and for example add an air vent opening somewhere (like many tents have). In fact I am planning to add that to my existing bivy, but so far I also did well with simply leaving the zippers open for some centimeters. Thanks to the strap that I sewed over the zipper I so far had no water coming in during rains. In winter though, cold comes in (which wouldn’t change with an air vent either).
The very fine mesh I mentioned was only to keep insects out. I use it in dry nights mainly. The reason why I chose the very fine mesh is because we have these biting no-see-ums here, and I really don’t want to share my bivy with them :-))
Floor
Regarding the floor: Here I did not spend so much time on finding another material. In summer/autumn I often put up my bivy on rocky ground, or simply on shrubs. I even have been forced once to sleep on blueberries, as I couldn’t find any other spot to sleep. So here durability and material strengths was certainly the most important criterion for me, beside obviously being waterproof. So far I am quite happy with the PU-coated nylon I chose. For example the Tyvek ground sheet I mentioned above was more kind of an experiment: I didn’t use this material before and was curious to test it. But already after two or three weeks of using it I found the first holes in it, whereas the nylon is still absolutely fine (having served around 2 months in use by now).
So to sum it up: while wanting to make by bivy light-weight, this was not the most important criterion for me. Due to the environment in which I am mainly using it, as well as due to general environmental concerns, breathability and durability where very important aspects for me. This influenced my material choice significantly and might have led to more weight than probably possible when focusing on ultralight materials.
I hope this answers your questions. Would be nice to hear which material’s you eventually went for. Either way, good luck with your project and all the best on your PCT trip!
Cheers,
Gerald